Neuronexus Neurotrophic Electrode (NXNE)
The NXNE has been developed by Neuronexus based on the principle of the Neurotrophic Electrode, namely, in-growth of neuropil that achieves long lasting survival of single units. For references see next section and reference list on this web site. It can be purchased from Neuronexus Inc., phone: 734 913 8858. The cost has yet to be determined. The original Neurotrophic Electrode, described below, can be purchased from Neural Signals Inc. (Call 404-771-2034).
Data related to the functionality and the histological analysis are shown in the poster. A paper is being written that is undergoing review by a publisher. It is available for private viewing. It shows the results of recordings from rat cortex. Call Dr. Kennedy at 404-771-2034 or email: Phlkennedy@aol.com
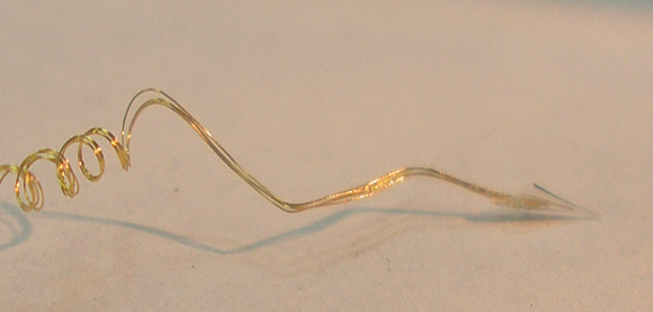
The NXNE is shown here:
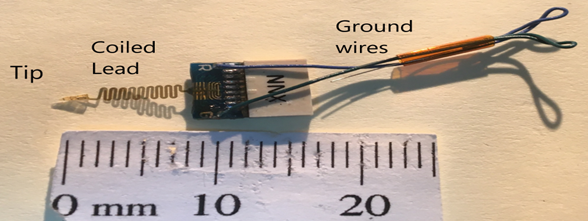
Note the tip on the left, with the serpentine cable, the connector and the ground and reference wires.
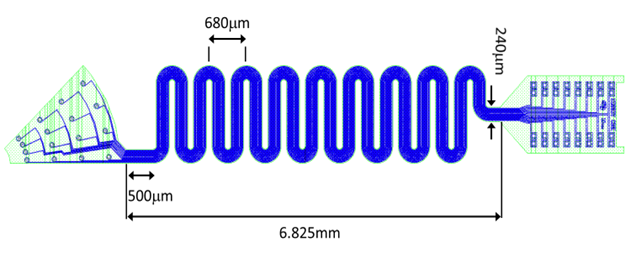
An enlarged image is shown here with the 16 channel tip, the cable that is serpentine for strain relief and the connector pad.
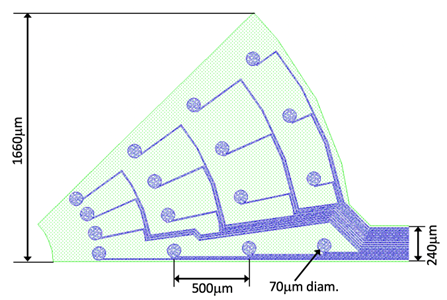
An enlarged image of the tip is shown here:
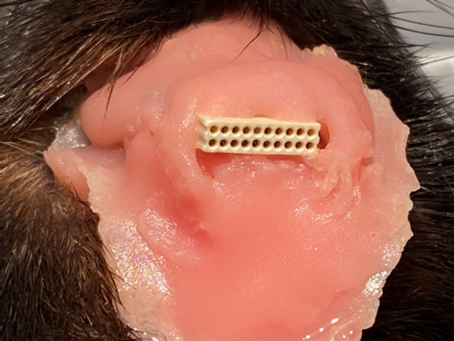
A photograph of the final appearance of the rat implant with the connector and the pink acrylic cement.
Reception of Electrode: You will receive the NXNE electrode secured inside a small plastic box. The box will be double bagged after being sterilized using ethylene oxide (see section below). The impedance of the 16 recording surfaces will accompany the box. The box will have a serial number.
Insert Nerve Growth Factor (NGF): Prepare the NGF (Sigma: NGF-b from rat, N 2513) 0.1 mg in the single vial in which it arrives. Using a sterile pipette (5-00-1025 from Drummond Scientific Company, Broomall, PN 19008), allow one drop of 25 microliters of distilled and sterile water to touch the NGF. It will dissolve the NGF. Touch the tip of the electrode to the NGF liquid and it will run in by capillary action. The electrode tip is now loaded and should not be allowed to touch anything to avoid the NGF running out of the tip. Do this just before beginning the surgery. Avoid contaminating the electrode.
Surgical technique: This description is for the rat, but will apply to other animals. Full sterility is used because, even though rats are very resistant to infections, the growth of neurites into the electrode tip obviously must be free of infection.
Anesthesia is induced using an IM injection of Ketamine (100 mg / ml) 0.3 ml for a 300 g rat. After five minutes when the rat is sedated, inject Pentobarbital (65 mg/ml) 0.5 mls intraperitoneally. The rat’s head is held in a stereotaxic frame for stability. The head is shaved and sterilized with betadine. After full draping, the scalp is opened in the midline and retracted. Two stainless steel skull screws are inserted rostral and two screws caudal to the skull opening. A 4 mm opening is trephined into the skull over the area of interest. Posterior to Bregma suture is the barrel cortex which is a useful area for sensory testing of whisker input. Dental acrylic is placed on the screws and the intervening skull bone after it has been scraped free of any periosteum in order to enhance adherence of the cement to the bone.
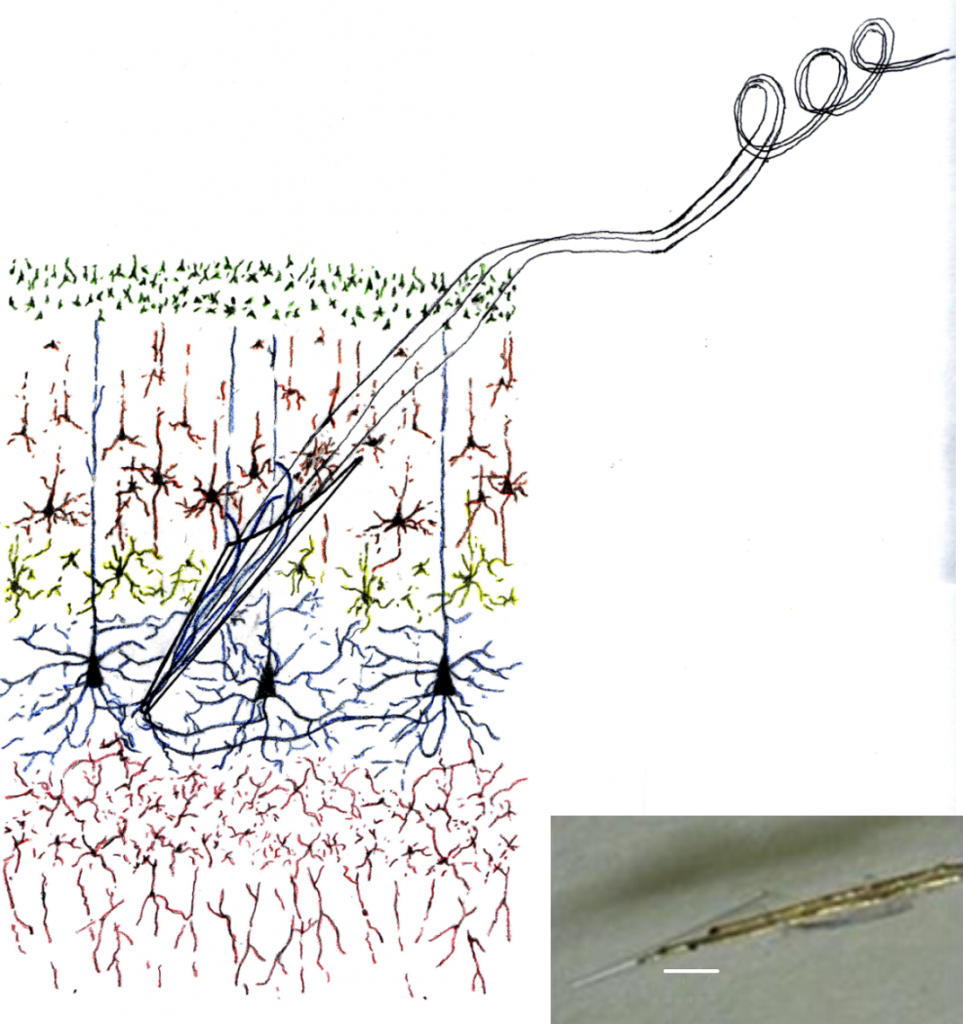
Electrode insertion: The prepared electrode is mounted on a 3-D micromanipulator. The dura is opened picking it up with a fine forceps or an angled sharp point, and incised with a fine scissors. The pia mater is incised with a sharp pointed iridectomy scalpel and the cortex is incised to a depth of 1-2 mm at a 45 degree angle.The electrode is maneuvered by the micromanipulator and the tip is inserted into the opening at the 45 degree angle. Alternatively, the electrode can be inserted by hand. NEVER touch the insulated cable. A titanium ‘forked tip Y hook’ instrument (Fine Science Tools Inc.) is used to push on the glass upper end to ensure that the tip is fully inserted. The curves on the wire limit insertion depth. See figure 1 below.
Closure: The electrode wire is laid on the skull and the connector is separated from the micromanipulator. Gelfoam is laid in the opening all around and over the electrode wires to act as a ‘bed’ for the electrode. The dura is not closed. Dental acrylic is gently poured over the Gelfoam and around the connecting pin. The pin has a mating pin that should be inserted to protect against blood or etc entering. The scalp is closed around the cement using 4/0 acrylic sutures (optional). The rat is removed from the frame and returned to a plastic cage with no wires that, in the past, have been used by the rat to snag the connecting pins and damage or remove the implant. Body temperature, response to a paw pinch, paw color and oxygen level are monitored until the rat responds vigorously to a paw pinch. He or she is then returned to its cage. Analgesics and antibiotics are not needed. The operation lasts 2-4 hours.
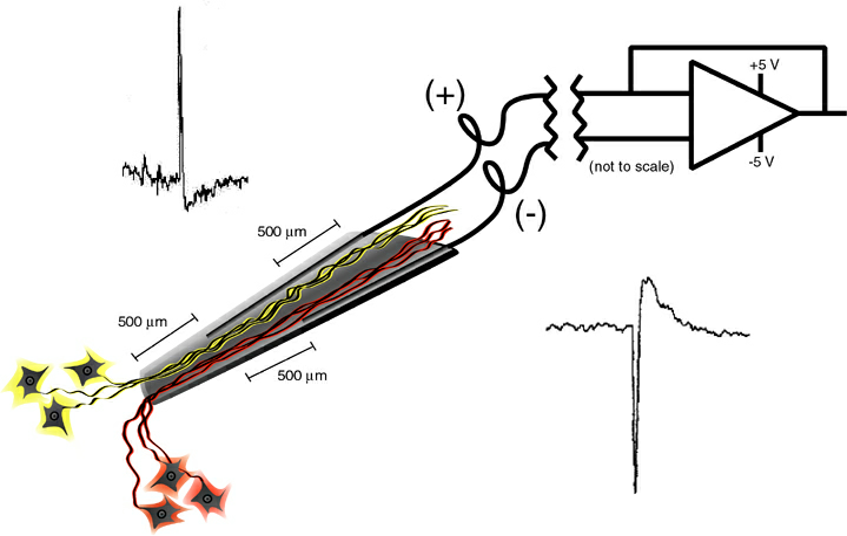
Recording: Unipolar recording referenced to ground has been used. The glass tip protects against external electrical interference. The neurites will begin to grow in at about two weeks and can be tracked over time until they stop growing at 3 to 4 months. Once stabilized, it is expected the recording of single units will persist without changing the cluster cut parameters for the lifetime of the rat. Expect at least 20 single units per channel.
Neurotrophic Electrode
The Neurotrophic Electrode (NE) is a long-lasting implantable electrode that records from as many as 20 single units per pair of wires and has lasted 13 years in one human participant with no evidence of gliosis on histological examination. Recording at years 9 and 10 years post implantation revealed single units that could be conditioned. See references for details.
Reception of Electrode: You will receive the electrode in a distilled water filled jar. It will be secured inside a small plastic box. The water filled jar acts as a shock absorber so the electrode will arrive intact. To remove, slowly drain the water and remove the plastic box. The wet electrode wires will be held against the bottom or top of the box. Open the box carefully and allow the electrode to dry out over a day or more.
Removal of Electrode from box: When dry, remove the electrode from the box by removing the holder that can be used to handle the electrode. Never touch the gold wires of the electrode, with fingers or forceps, because it may damage the Teflon insulation on the wire. Once it is dry, it can be sterilized.
Sterilization:
The preferred method of sterilization is the use of ethylene oxide. Use moderate temperatures near 60 C. Do not remove the ethylene by negative pressure and high temperature because it will damage the electrode-to-glass connection which is glued with methyl methacrylate. Instead, allow it to aerate for 1 week.
An alternative method of sterilization is to place the NE in 95% alcohol overnight. Make sure there is no bubble of air inside the tip by examining it under a microscope. A way to avoid the bubble is to touch the tip into the alcohol before immersion, allowing the alcohol to run into the tip by capillary action. If placing more than one electrode in the alcohol make sure they don’t get tangled together. Place them far apart. Remove from the alcohol after an overnight (12 hour) soak and allow the alcohol to evaporate for about an hour. .
Insert Nerve Growth Factor (NGF): Prepare the NGF (Sigma: NGF-b from rat, N 2513) 0.1 mg in the single vial in which it arrives. Using a sterile pipette (5-00-1025 from Drummond Scientific Company, Broomall, PN 19008), allow one drop of 25 microliters of distilled and sterile water to touch the NGF. It will dissolve the NGF. Touch the tip of the electrode to the NGF liquid and it will run in by capillary action. The electrode tip is now loaded and should not be allowed to touch anything to avoid the NGF running out of the tip.
Surgical technique: This description is for the rat, but will apply to other animals. Full sterility is used because, even though rats are very resistant to infections, the growth of neurites into the electrode tip obviously must be free of infection.
Anesthesia is induced using an IM injection of Ketamine (100 mg / ml) 0.3 ml for a 300 g rat. After five minutes when the rat is sedated, inject Pentobarbital (65 mg/ml) 0.5 mls intraperitoneally. The rat’s head is held in a stereotaxic frame for stability. The head is shaved and sterilized with betadine. After full draping, the scalp is opened in the midline and retracted. A 4 mm opening is trephined into the skull over the area of interest. Posterior to Bregma is the barrel cortex which is a useful area for sensory testing of whisker input. Two stainless steel skull screws are inserted rostral and two screws caudal to the opening. Dental acrylic is placed on the screws and the intervening skull bone after it has been scraped free of any periosteum in order to enhance adherence of the cement to the bone.
Electrode insertion: The prepared electrode is mounted on a 3-D micromanipulator. The dura is opened picking it up with a fine forceps or an angled sharp point, and incised with a fine scissors. The pia mater is incised with a sharp pointed iridectomy scalpel and the cortex is incised to a depth of 1-2 mm at a 45 degree angle. The electrode is maneuvered by the micromanipulator and inserted into the opening at the 45 degree angle. Alternatively, the electrode can be inserted by hand. NEVER touch the Teflon insulated wires. A titanium ‘forked tip Y hook’ instrument (Fine Science Tools Inc.) is used to push on the glass upper end to ensure that the tip is fully inserted. The curves on the wire limit insertion depth. See figure 1 above.
Closure: The electrode wire is laid on the skull and the connector is separated from the micromanipulator. Gelfoam is laid in the opening all around and over the electrode wires to act as a ‘bed’ for the electrode. The dura is not closed. Dental acrylic is gently poured over the Gelfoam and around the connecting pin. The pin has a mating pin that should be inserted to protect against blood or etc entering. The scalp is closed around the cement using 4/0 acrylic sutures (optional). The rat is removed from the frame and returned to a plastic cage with no wires that, in the past, have been used by the rat to snag the connecting pins and damage or remove the implant. Body temperature, response to a paw pinch, paw color and oxygen level are monitored until the rat responds vigorously to a paw pinch. Analgesics and antibiotics are not needed. The operation takes 2-4 hours.
Recording: Bipolar recording is optimal because the glass of the tip protects against external electrical interference. Monopolar recording between one wire and a ground on the rat will result in poor quality recording. A simple test is to compare both mono- and bi- polar recordings. The neurites will begin to grow in at about two weeks and can be tracked over time until they stop growing at 3 to 4 months. Once stabilized, it is expected the recording of single units will persist without changing the cluster cut parameters for the lifetime of the rat. Expect at least 20 single units per pair of wires.
Videos: Two videos of implantation in a human are available here. The first demonstrates making the opening in the brain, and the second demonstrates the insertion of the electrode. Note the iridectomy knife with a 4 mm blade, and the ‘fork tipped Y hook’ used to push the glass tip into the brain.
Special tools:
- Iridectomy knife from Fine Science Tools Inc.
- ‘Fork tipped Y hook’ instrument from Fine Science Tools Inc.
If you require these special tools, we can provide them at a small extra cost to be determined.
Price of a 2 wire electrode is $1,000 including delivery. A four wire is priced at $1200 including delivery.
The following videos will demonstrate the incision of the cortex and the insertion of the electrode.